


The Top 10 Best Graphics Card Brands for 2021 - A Comprehensive Guide
The top 10 best graphics card brands for 2021 If you’re a PC gamer or a professional in need of high-performance graphics, finding the right graphics …
Read Article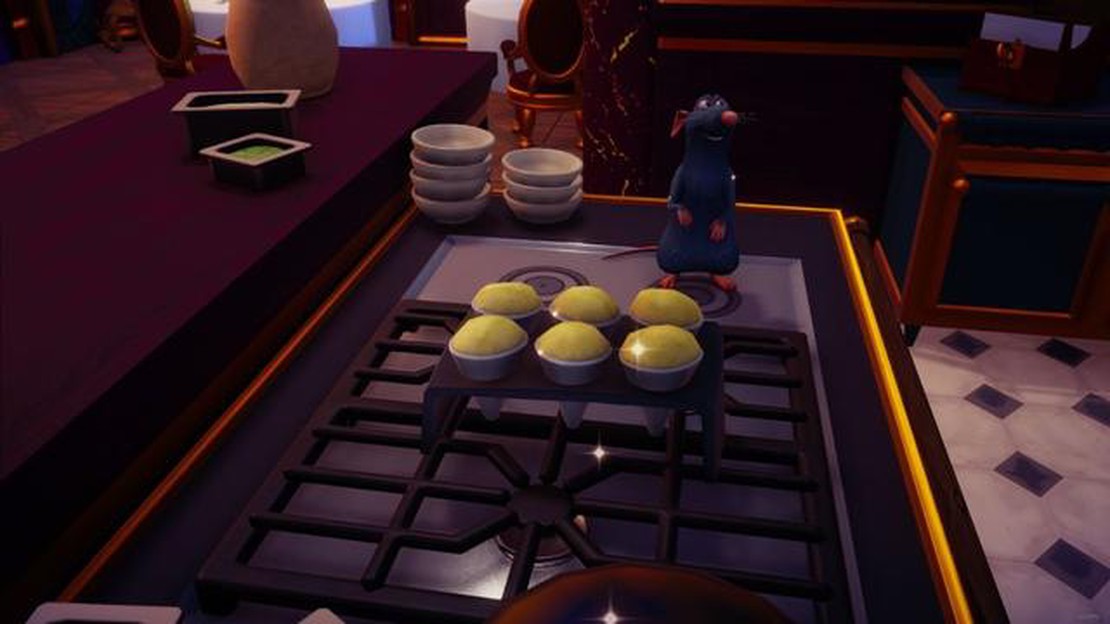
Welcome to Disney Dreamlight Valley, where magical adventures and delicious treats await! One of the most refreshing and fun treats you can enjoy in the valley is the sour snow cone. Packed with tangy flavors and topped with colorful syrups, sour snow cones are a must-try for anyone looking to cool off and satisfy their sweet tooth. In this step-by-step guide, we’ll show you how to create your own sour snow cone right in the heart of Disney Dreamlight Valley.
First, let’s gather our ingredients. You’ll need crushed ice, sour flavors such as lemon, lime, or sour apple, and a variety of colorful syrups. You can find these ingredients at the Magical Snow Cone Stand located near the Enchanted Castle. Once you have everything ready, it’s time to start making your sour snow cone.
To begin, grab a cup or a cone from the stack provided at the stand. Fill it up with the crushed ice, making sure to leave some space at the top for the delicious sour flavors and syrups that will be added later. The more ice you have, the better the snow cone will hold its shape and stay cold on a hot day in Disney Dreamlight Valley.
Next, it’s time to add the sour flavors. Pick your favorite or try a combination of different flavors for a unique taste. Drizzle the sour flavors over the ice, making sure to cover it evenly. The tanginess of the flavors will add a delightful twist to your snow cone and make it truly unforgettable.
Finally, it’s time to finish off your sour snow cone with a splash of color. Grab the colorful syrups provided at the stand and pour them over the ice. Watch as the vibrant reds, blues, yellows, and greens mix together, creating a beautiful artwork on your snow cone. Feel free to get creative and experiment with different combinations of flavors and colors to make your snow cone truly one-of-a-kind. And there you have it - a delicious sour snow cone ready to be enjoyed in Disney Dreamlight Valley.
Experience the magic of Disney Dreamlight Valley with a sour snow cone in hand. The combination of tangy flavors and cool ice will transport you to a world of joy and delight. Don’t forget to visit the Magical Snow Cone Stand near the Enchanted Castle to create your own sour snow cone and make lasting memories in this enchanting land of wonder.
Disney Dreamlight Valley is known for its delicious and unique treats, and one of the most popular is the sour snow cone. This refreshing and tangy treat is perfect for cooling down on a hot day and satisfying your sweet tooth. Follow this step-by-step guide to learn how to make sour snow cones at home.
Making sour snow cones in Disney Dreamlight Valley is a fun and delicious activity for the whole family. Experiment with different sour syrup flavors and combinations to create your own unique and exciting treats. Whether you’re reliving your favorite theme park memories or experiencing the magic for the first time, these sour snow cones are sure to be a hit!
When making sour snow cones in Disney Dreamlight Valley, the first step is to choose the perfect flavor. The right flavor can make all the difference in creating a delicious and refreshing snow cone. Here are some tips to help you choose the perfect flavor:
Once you’ve chosen the perfect flavor, you’re ready to move on to the next step in making sour snow cones in Disney Dreamlight Valley.
When it comes to serving sour snow cones in Disney Dreamlight Valley, presentation is key! Follow these steps to create a colorful and eye-catching snow cone presentation that will delight your guests:
With this step-by-step guide, you’ll be able to create a visually stunning and tangy snow cone presentation that will leave a lasting impression on your guests in Disney Dreamlight Valley.
Looking to take your snow cone to the next level? Add a sour twist to your favorite icy treat at Disney Dreamlight Valley! With just a few simple steps, you can create a mouth-puckering snow cone that will delight your taste buds.
Read Also: Discover the Best Event Armors in Monster Hunter World's Top 10
What You’ll Need:
Step 1: Prepare the Snow Cone
Read Also: Everything You Need to Know About Azalea Trees in Minecraft - Tips and Tricks
If you have a snow cone machine, follow the manufacturer’s instructions to create a fluffy snow cone. Alternatively, you can use shaved ice if you don’t have a machine. Scoop the shaved ice into a cup or cone and pack it down gently.
Step 2: Add the Sour Syrup
Take your sour syrup of choice and slowly pour it over the top of the snow cone. Start with a small amount and add more to taste. Allow the syrup to seep into the ice, adding a colorful and tangy twist to your creation.
Step 3: Mix and Enjoy
Once you’ve added the sour syrup, use a spoon or straw to mix it into the ice. Make sure the syrup is evenly distributed throughout for a perfectly sour snow cone. Take a bite and savor the sweet and tangy combination.
Tips:
Now that you know how to add a sour twist to your snow cone, it’s time to get creative and enjoy this refreshing treat at Disney Dreamlight Valley. Happy snacking!
To make sour snow cones in Disney Dreamlight Valley, you will need snow cone syrup, sour spray, crushed ice, and optional toppings such as gummy worms or sour candies.
Yes, you can still make sour snow cones at home even if you don’t have access to Disney Dreamlight Valley. You can purchase snow cone syrup and sour spray from a local store or online, and use crushed ice to make the snow cones.
To make the snow cones sour, you simply need to spray them with sour spray. You can apply as much or as little sour spray as you like, depending on your taste preference.
Some optional toppings for the sour snow cones include gummy worms, sour candies, or any other toppings that you prefer. These toppings can add extra flavor and texture to your snow cones.
Yes, you can use a regular snow cone machine to make these sour snow cones. You will still need snow cone syrup, sour spray, crushed ice, and optional toppings to make the sour snow cones.
To store the leftover snow cone syrup and sour spray, you should follow the instructions on the packages. Most syrups and sprays can be stored in a cool, dry place, away from direct sunlight.
The top 10 best graphics card brands for 2021 If you’re a PC gamer or a professional in need of high-performance graphics, finding the right graphics …
Read Article
How much have I spent on Roblox? How to check Roblox purchase history Roblox is a popular online gaming platform where users can create and play games …
Read Article
Where to find the Flame, Cleanse Me incantation in Elden Ring Welcome to our guide for Elden Ring, where we will be discussing the Flame, Cleanse Me …
Read Article
NHL 23: Beginner’s guide to defense – How to position yourself, controls, and tips Welcome to NHL 23! Whether you’re new to the game or just looking …
Read Article
How to become a king or queen in BitLife Are you ready to live the life of royalty in BitLife? Becoming a king or queen is one of the most exciting …
Read Article
FIFA 23: All FIFA World Cup Swap Tokens and where to get them The FIFA World Cup is the most prestigious tournament in international football, and …
Read Article


